3D Printing Optogenetic Interfaces
Optogenetics allows light to communicate with nerves. To enable this communication in the peripheral nervous system, nerve cuffs wrap around the nerve and hold a light source, usually a fiber optic cable or a micro light-emitting diode (µLED), to the nerve. To facilitate mouse research in different parts of the peripheral nervous system, a way to print viable nerve cuffs with 3D printers is being developed.
Why 3D print optogenetic interfaces?
3D printers allow for the rapid iteration of different designs and give the ability to customize the design for specific anatomical geometries. Using a Digital Light Processing 3D printer in the McLeod Lab at the University of Colorado Boulder, nerve cuffs can be 3D printed with biocompatible materials, using light to cure each layer. Digital Light Processing 3D printers use a vat of liquid resin and a light to cure each layer of the part. As shown in Figure 1, the build plate steps up with each layer, allowing the light to polymerize a new layer. This allows for the design of intricate parts and fine details.
-3d-printer.png?sfvrsn=92d617bb_0)
Figure 1: Digital Light Processing (DLP) 3D Printer process1
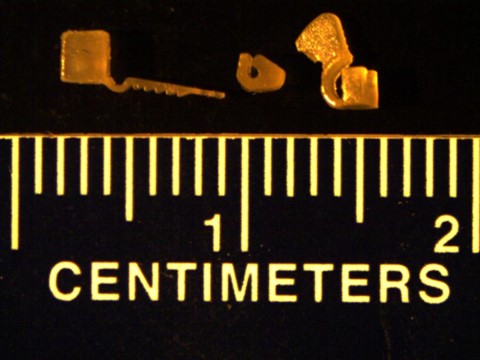
Below are some sample prints of optogenetic interfaces created using this 3D printer. These are potential designs for three different nerve cuffs.

Figure 2: 3D Printed Neuromodulation Interfaces printed using PEGDA resin (Left: Self-Securing Optical Probe2, Center: Passive Nerve Cuff, Right: Pull-Through Nerve Cuff)
What characteristics are important for nerve interfaces?
Material properties are important to consider when creating devices that will be implanted in the body. For our purposes we are concerned about the following:
- Biocompatibility: Our materials should be non-cytotoxic and meet the guidelines given by ISO 10993
- Soft: Our material should have an elastic modulus ≤ 5MPa because this is similar to the elastic modulus of nerve tissue (Guimarães, 2020)
- Tough: The material should be robust under forcep handlingtto allow for smooth implantation during surgery.
- High-Resolution Printing: The feature sizes must be smaller than 183µm as the Cervical Vagus Nerves in mice are approximately 183µm in diameter (Stakenborg, 2020)
We first tested out a PEGDA Resin as an option for creating these nerve cuffs.3 This resin consists of the following:
- Monomer: Polyethylene Glycol Diacrylate (PEGDA) - 97.91%
- Cross-linker: pentaerythritol tetrakis(3-mercaptopropionate) (PETMP) - 0.99%
- Photoabsorber: Tinuvin CarboProtect from BASF - 0.80%
- Photoinitiator: Diphenyl(2,3,6-trimethylbenzoyl)phosphine oxide (TPO) - 0.25%
- Thermal Initiator: Azobisisobutyronitrile (AIBN) - 0.05%
What material should be used to print these interfaces?
The PEGDA resin could be a promising solution if we could adjust the formulation to decrease the elastic modulus and increase the toughness. We conducted a series of tests, the results are summarized in Table 1.
Table 1: Adjusting the PEGDA Formulation
| Variable Change | Elastic Modulus | Toughness |
| Lower PEGDA Molecular Weight | Increased | Increased |
| Higher PEGDA Molecular Weight | Decreased | No Change |
| Composite PEGDA Molecular Weight | Increased | Increased |
| Lower Percent of PETMP | Decreased | Decreased |
| Higher Percent of PETMP | Increased | Increased |
| When Mixing Higher Molecular Weight PEGDA into Solution… | ||
| Higher Percent of PEGDA | Increased | Increased |
| Lower Percent of PEGDA | Decreased | Decreased |
Based on these results, adjusting the formulation could not decrease the elastic modulus while sufficiently increasing the toughness. Therefore, the PEGDA Resin is not a viable solution for this application.
Looking into new commercially available resins, BioRes-Silicone from B9 Creations seemed promising. It is elastomeric, tear resistant, and offers a quick return. The tensile modulus is 1.6MPa and it meets ISO 10993 standards when printed with a biocompatible printer. Test prints were created using two different printers to determine if the material would have a high enough resolution to be used in this application, the results are summarized below.
Table 2: Resolution test results from two different 3D printers. The resolution quality is relative to the printer’s claimed resolution.
| Resolution | McLeod, DLP 3D Printer | B9Creations, B9 Core 530 3D Printer |
| X-Y Resolution | Good | Good |
| Z Resolution | Poor | Okay |
| Poor Z-Resolution quality is from overpolymerization due to Light Bleed Through | Z-resolution quality can be improved with CAD Optimization; Implanted; Used for Optogenetic VNS - Heart Rate Reduction Observed |

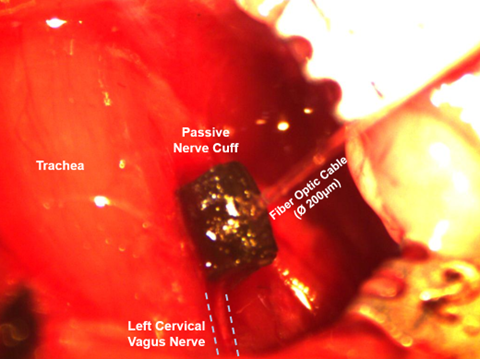
Figure 3: Both images are of the Passive Nerve Cuff 3D printed in BioRes-Silicone with the B9 Core 530 Printer by B9Creations. Left: Passive nerve cuff with fiber optic cable. Right: Passive nerve cuff with fiber optic cable holding the passive cuff open.
How do these interfaces work?
These interfaces can be implanted around a nerve in a mouse, as shown in Figure 4. This study is focused on the stimulation of the vagus nerve, so these nerve cuffs were implanted around the left cervical vagus nerve in a mouse. Figure 5 shows the stimulation of the nerve using the light from a fiber optic cable inserted into a hole in the nerve cuff.

Figure 4: Implanted Passive Nerve Cuff around the left cervical vagus nerve of a mouse.
.jpg?sfvrsn=8c8011bb_0)
Figure 5: Optogenetic Vagus Nerve Stimulation (VNS) in a mouse.
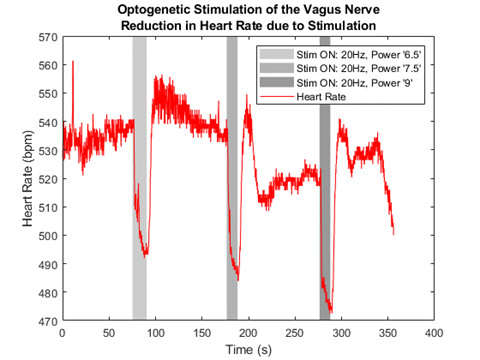
By stimulating the left cervical vagus nerve, this research has shown that these nerve cuffs can be used to reduce the heart rate of a mouse. In Figure 6, when the light is turned on (gray rectangles), there is a significant reduction in the mouse's heart rate.

Figure 6: Heart rate response to optogenetic stimulation of the left cervical vagus nerve in a mouse.
What's next in our research?
- We need to further optimize the passive nerve cuff geometry for implantation and to improve Z resolution when 3D printing the device.
- We are working to design a nerve cuff for a µLED instead of a fiber optic cable.
References
- Uzcategui, A. C., Higgins, C. I., Hergert, J. E., Tomaschke, A. E., Crespo-Cuevas, V., Ferguson, V. L., Bryant, S. J., McLeod, R. R., & Killgore, J. P. (2021). Microscale Photopatterning of Through-thickness Modulus in a Monolithic and Functionally Graded 3D Printed Part. Small Sci, 1(3). https://doi.org/10.1002/smsc.202000017
- Littich SF (2020) Design of a Reusable Elastomer Cuff for Stable in Vivo Imaging of Murine Vagus Nerve Axons. In: University of Colorado at Denver.
- Uzcategui, A. C., Muralidharan, A., Ferguson, V. L., Bryant, S. J., & McLeod, R. R. (2018). Understanding and Improving Mechanical Properties in 3D printed Parts Using a Dual-Cure Acrylate-Based Resin for Stereolithography. Adv Eng Mater, 20(12). https://doi.org/10.1002/adem.201800876
