BDC Home Telemedicine
Omnipod Upload Guide
Follow the steps below to upload your Omnipod Eros or DASH to Glooko.
If using a Dexcom and it is linked to your pump, you do not need to upload it separately.
If using a Dexcom or another CGM that is not linked to your pump, you will need to upload it separately. See bottom of page.
Uploading varies by pump version. Check your pump model before continuing.
Choose your upload method.
Before you get started:
What model Omnipod are your using?
| Model | Upload Method |
| Eros or older | Manual Upload only |
| DASH | Manual Upload or Wireless Sync |
| !! Wireless Sync via Podder Central and Glooko !! |
Syncing your device wirelessly requires a Podder Central account. You may have set this up at your pump-start class. If you do not remember your account username or password, you can recover it from PodderCentral.com. You will need this information to continue set up the wireless connection. If you recently started a new pump or got a warranty replacement and the new device is not linked to your Podder Central account, you will have to contact Insulet customer support to link the correct pump to your account. |
Select the appropriate upload option below to get started.
Make sure this is your best option.
Before you continue:
If using the Eros or an older model, continue
Are you using the DASH system and have you previously synced wirelessly?
| If yes, you may not need to upload manually but make sure your sync is up to date. |
Please note: If you previously set up the wireless sync feature through Podder Central and Glooko and have your PDM connected to a wireless network, your data should still be syncing. Log in to Glooko to confirm your data are up to date.
If not up to date, follow the instructions below. |
Are you using the Omnipod 5 (OP5)?
| If yes, you need to sync wirelessly. |
Get Ready to Upload.
What you'll need:
- Your PDM
- USB cable (micro)
- Computer running Windows or Mac
Get Started
Don't plug in your pump just yet.
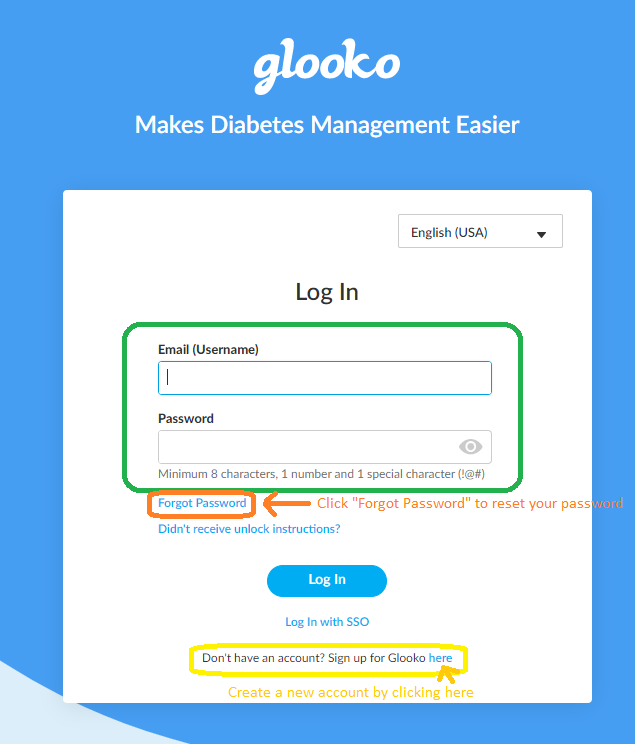
Go to Glooko and sign in
Go to my.glooko.com and sign in using your Glooko account.
If you do not already have a Glooko account, use the link at the bottom of the sign in window to create a new account.
Select Upload Omnipod PDM
If you have uploaded previously, you will see this option on the top of the Summary page. Click "Upload Omnipod PDM"
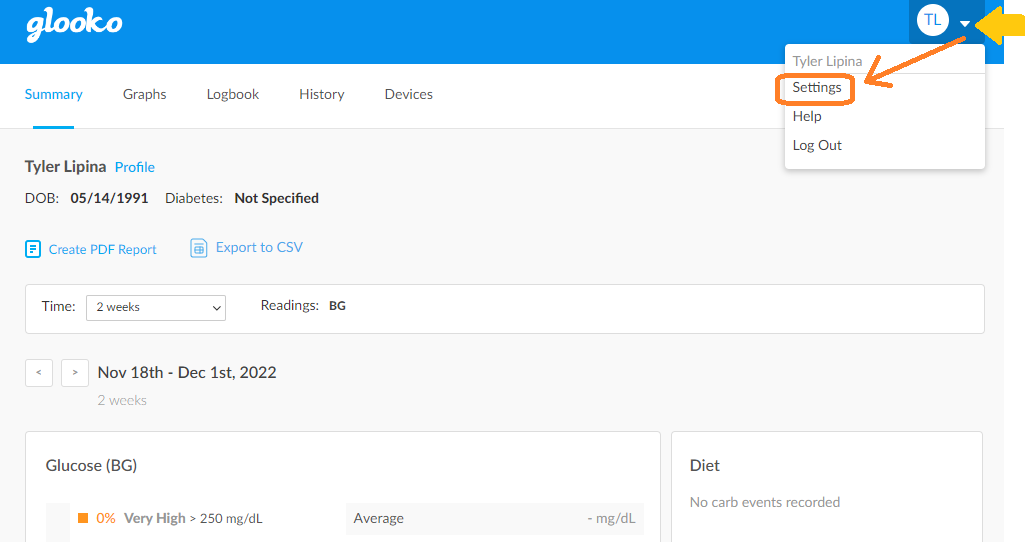
If you do not see this option, you can find it on the settings menu.
In the upper right corner, click the down arrow next to your account initials.
Then select "Settings"
Scroll down to the Apps & Devices Section then select "Upload Omnipod PDM".
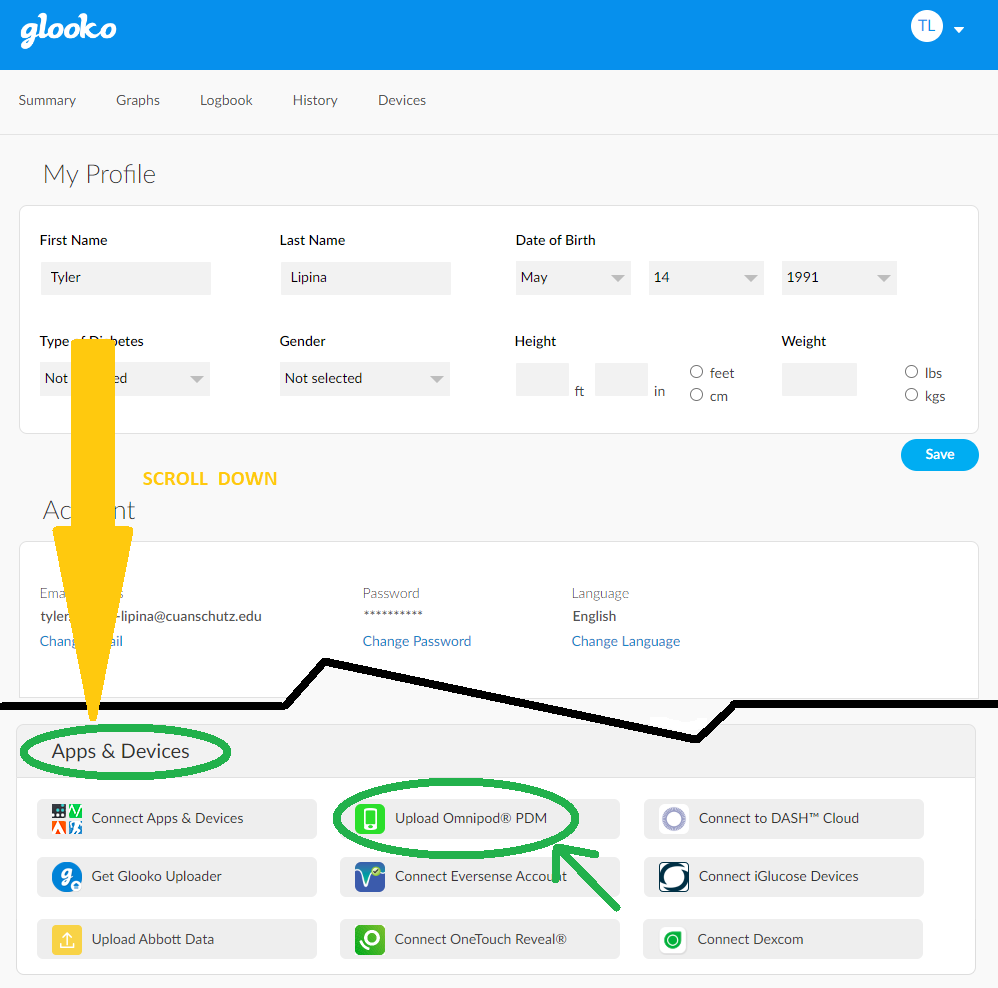
Plug in your PDM when prompted and follow the system prompts
Plug in your PDM.
- You will hear a single beep and your PDM will read "Preparing Data".
- Once ready, you will hear a series of beeps and the display will read "USB device ready". Don't press anything on the PDM at this point.
Click "Upload" on the browser window.
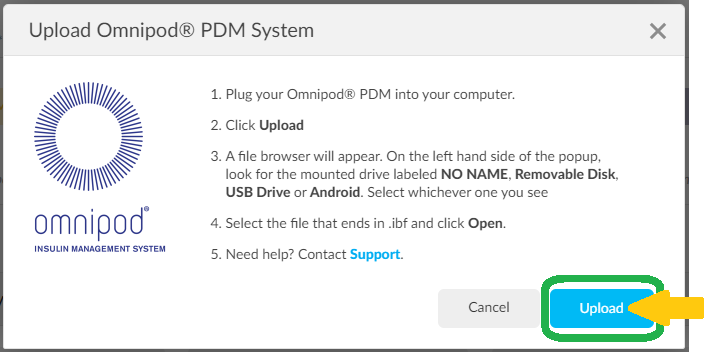
In the system window that opens, look for the external drive titled "NO NAME", "Removeable Disk", "USB Drive", or "Android". It should show up under the "This PC" section. Select that drive to open it's contents.
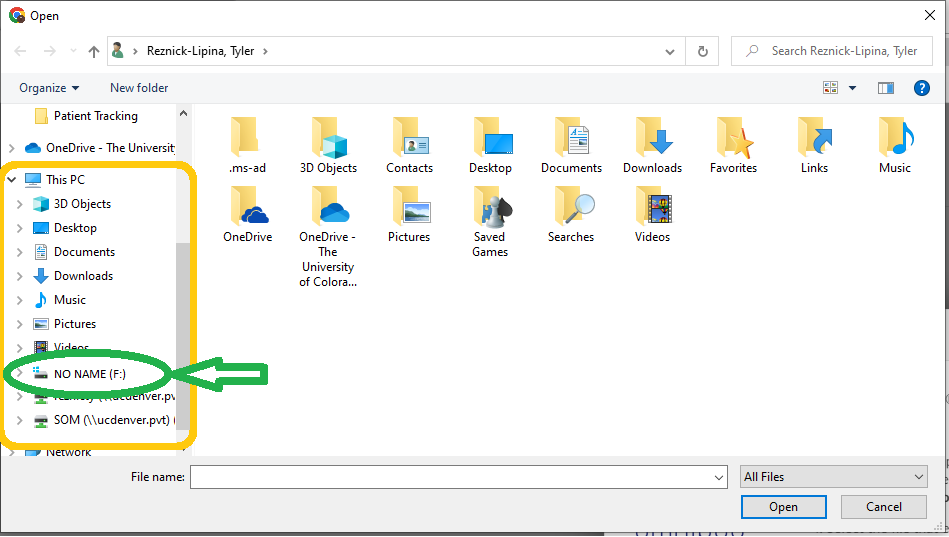
If this is not showing, you may need to restart by closing the window, unplugging, then plugging back in your PDM. Do not close the prompt on the PDM that states the device is ready.
If you do not get any prompt on the PDM, try a different USB cable - the one you are using may be broken, even if it is charging the PDM.
Double click the file with the .ibf extension to open it.
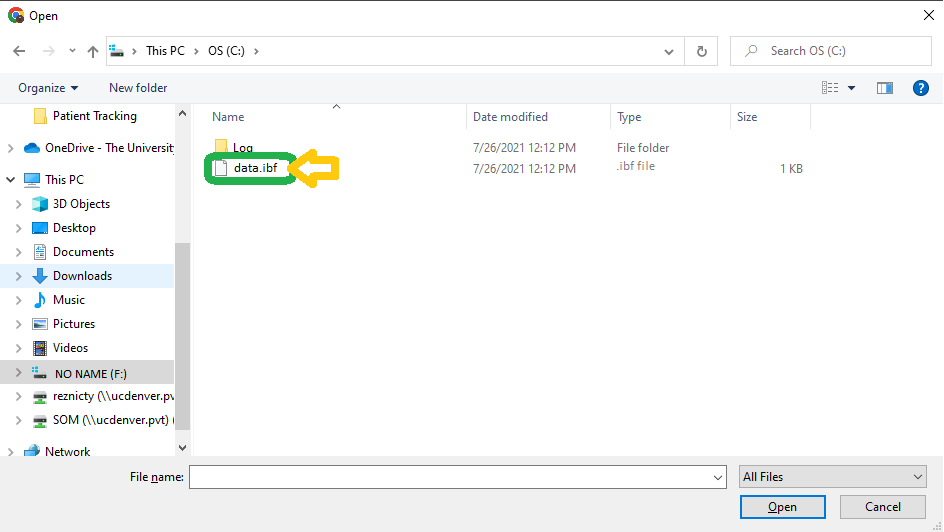
You may receive a pop-up asking you to confirm the serial number of your device.
A progress bar will display the status of the upload. It may take a few minutes.
Check your data
Once the upload is complete, click "View Data" to make sure the upload was successful.
On the Summary Page, you should see (1) today's date displayed as the last date of date range and (2) a purple pie chart showing insulin dosing. If your CGM is linked to your pump or you are sharing data from Clarity, you should also see data under the Glucose (CGM) section.
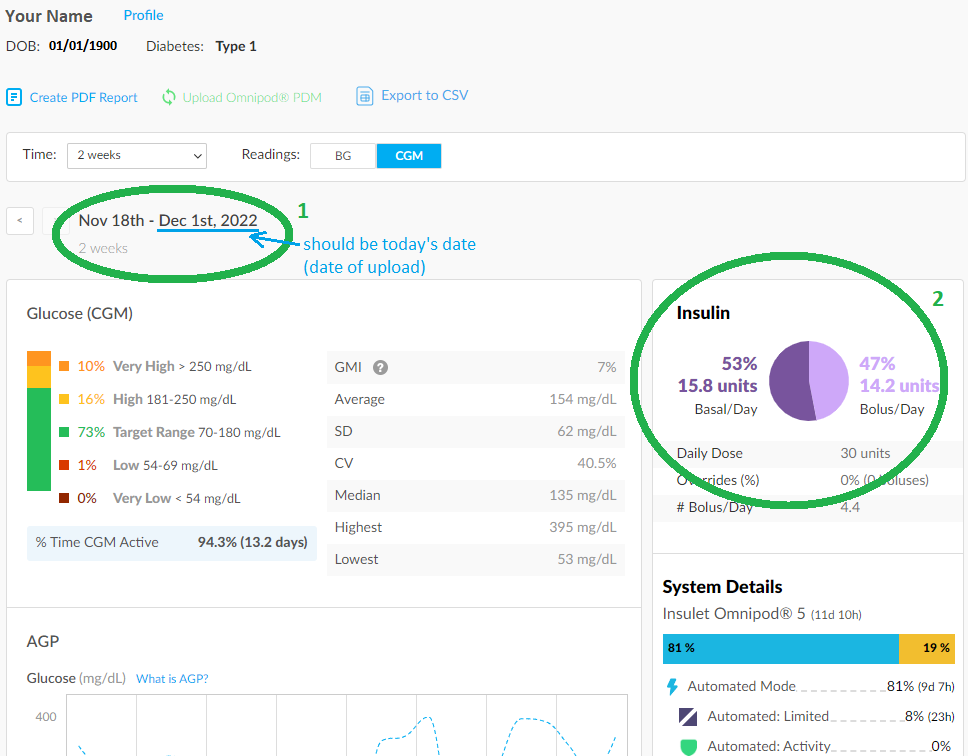
If the dates shown are not current or there is nothing showing under the Insulin section, re-run the upload steps above.
Share your data
If you have previously shared your Glooko data with the Barbara Davis Center, you are all set.
If you have not shared, or are not sure, check the settings menu.
Click the down arrow next to the account initials, then click "Settings".
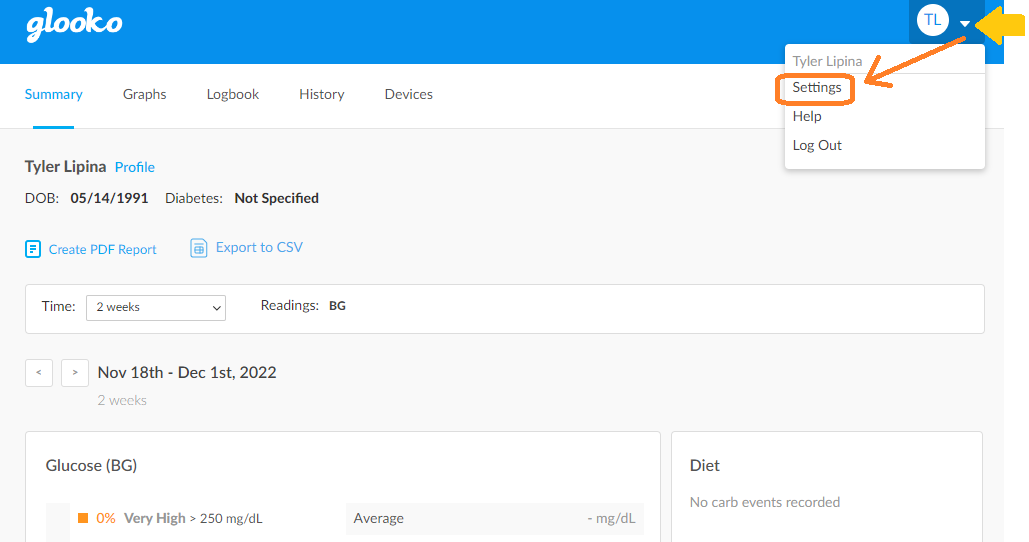
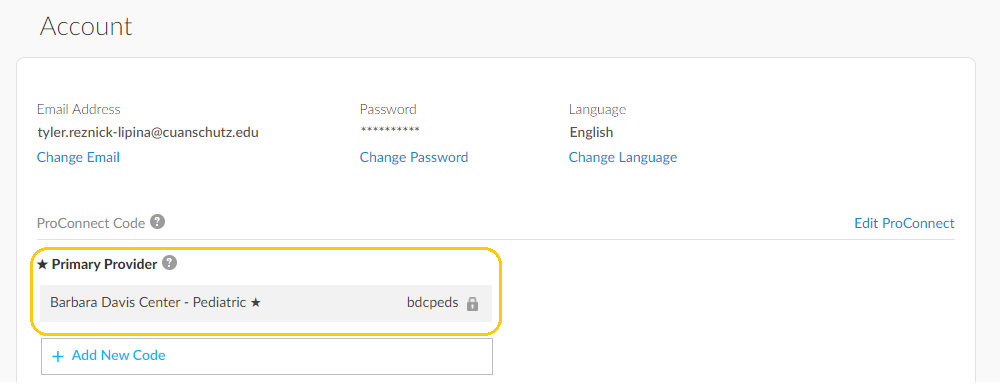
Under Account, find the ProConnect Code section.
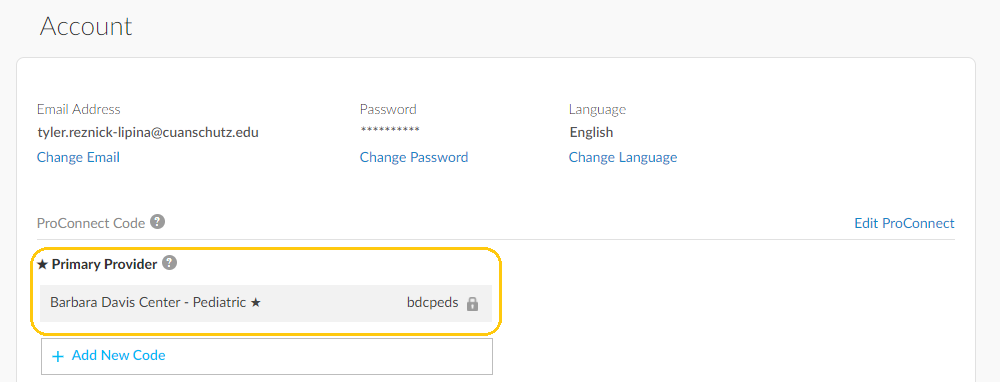
If you are already sharing with the BDC, it will be listed here. If you see "Barbara Davis Center - Pediatric" here, there is nothing more you need to do.
If the Barbara Davis Center is not listed, click " + Add New Code".
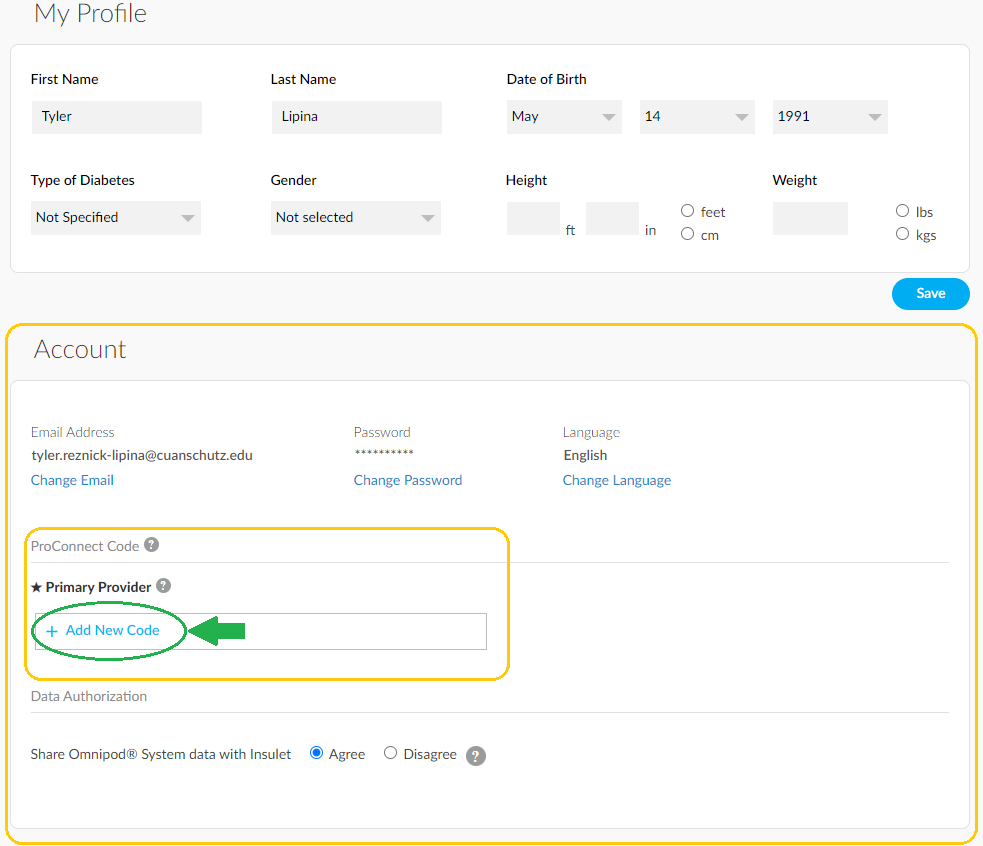
Click "Continue" on the notice box.
Enter the ProConnect code:
bdcpeds
Click "Submit
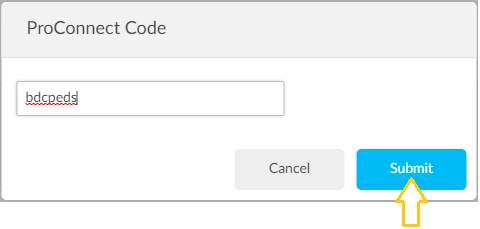
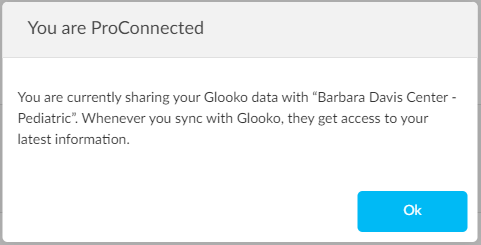
On the confirmation window, it should show that you are sharing with "Barbara Davis Center - Pediatric". Click Continue.
Once sharing, you should see "Barbara Davis Center - Pediatric" listed under ProConnect Code
You're all set!
If you have any questions or concerns, contact Tyler Lipina at [email protected].
Return to Patient Info Home
Make sure this is your best option.
Before you continue:
If using the DASH, continue
Are you using the Eros or an older model Omnipod?
| If yes, you need to upload manually. |
Select the Manual Upload tab above and follow the instructions provided. |
If using the Omnipod 5 (OP5), see OP5 Sync Instructions.
Get Ready to Sync your Data.
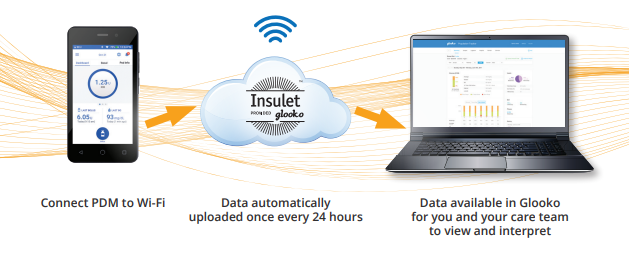
What you'll need:
- Your PDM
- A computer, tablet, or smartphone
- A private wireless network connection (i.e. your home network)
Overview Video:
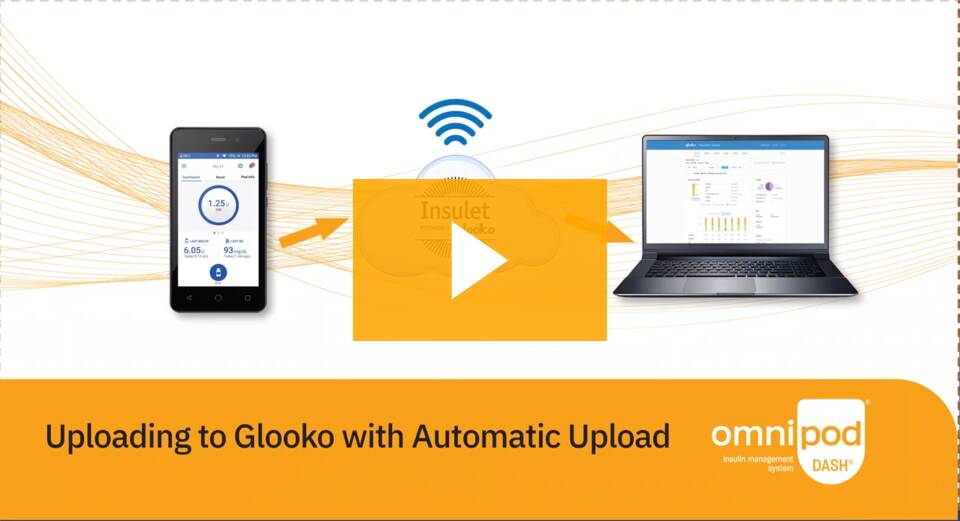
DASH Video Tutorials | Insulin Pump Therapy | Omnipod
Get Started
Create a PodderCentral Account
If you already have a PodderCentral account, you can skip this step.
Request a new account
Go to PodderCentral.com
Click "Sign up and join our Podder Community"
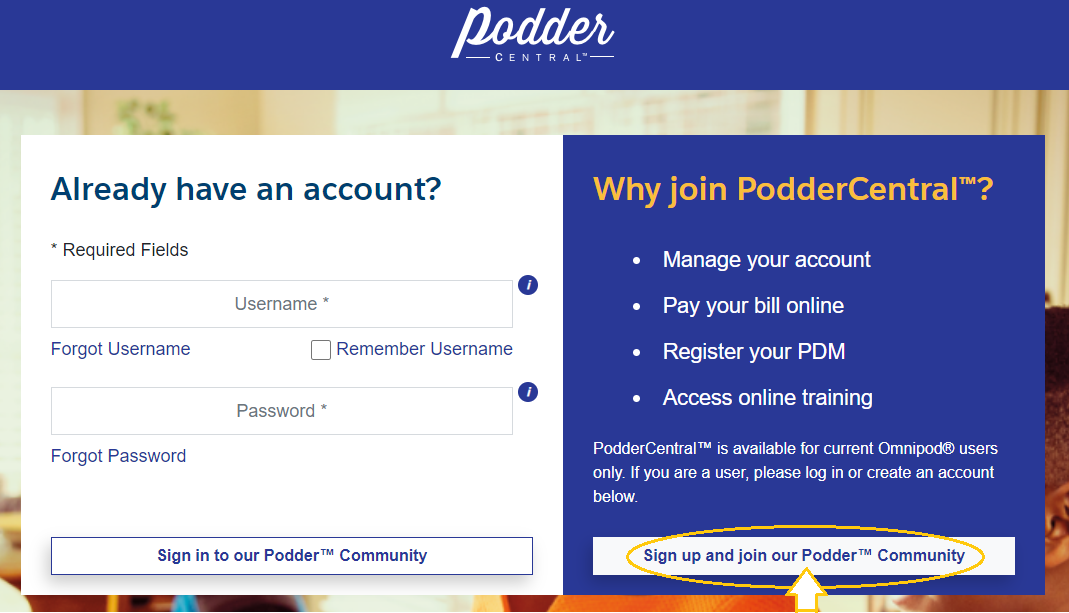
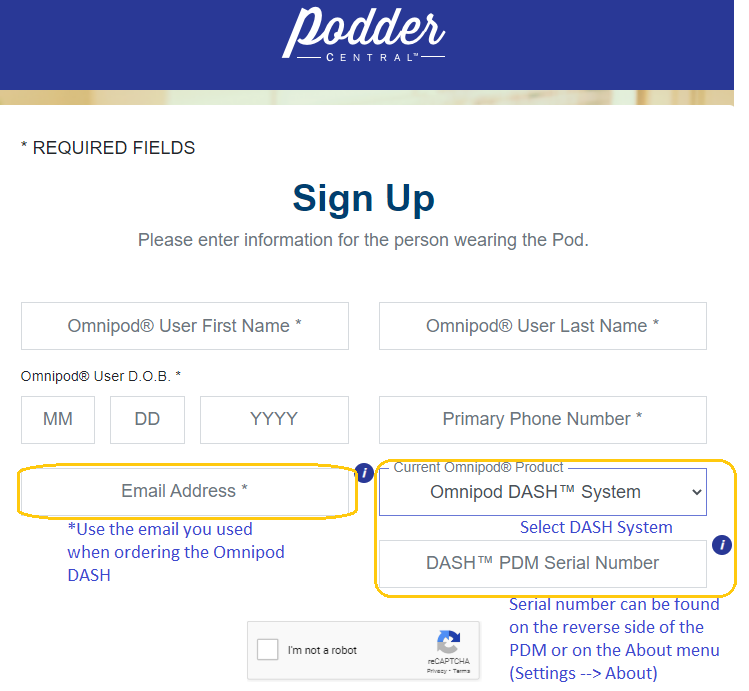
Complete the required fields
For email address, use the email you used when you ordered your device
For product, select the Omnipod DASH System and enter the serial number from your PDM (go to Settings --> About on the PDM)
Check the "I am not a Robot" prompt then click Submit
If prompted to provide a source, select "Other" unless your device was from Kaiser, then select "Kaiser"
On the Thank-you message, click close.
Confirm your email
Open your email in a browser.
Search for the email with the subject line "You're Invited to PodderCentral"
Click the link provided in the email.
You will be directed to the Account Setup page.
Complete account setup
Complete each of the required fields on step 1.
If the patient is under 18, a parent or guardian should be creating this account, however should use the patient's first name, last name, and DOB in the Omnipod User First Name, Omnipod User Last Name, and Omnipod User DOB fields.
Check the "I am not a Robot" prompt to continue.
Set security questions and answers on step 2 and complete the authorizations.
Certify that you:
- are 18 or older
- have read and agree tot the terms of service, privacy notice, and privacy policy
- authorize contact from Insulet and/or it's subsidiaries
Click "Register".
Enable and Connect to Wi-Fi on the PDM
On the PDM, tap the Menu icon in the upper left corner
Select "Settings", then select "PDM Device" and find "Wi-Fi"
Make sure the toggle switch it set to on.
Tap to turn on.
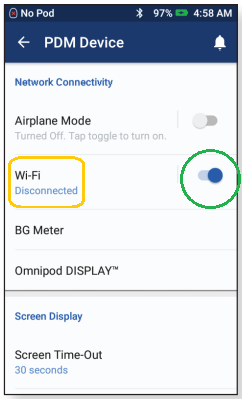
Tap "Wi-Fi" to open the Wi-Fi menu and select your network
You must connect to a password protected, private network (such as you home network). You will not be able to connect to a network that requires terms and conditions to be approved in a browser window.
Enter your network password then tap "Connect".
Confirm that you are connected to your network.
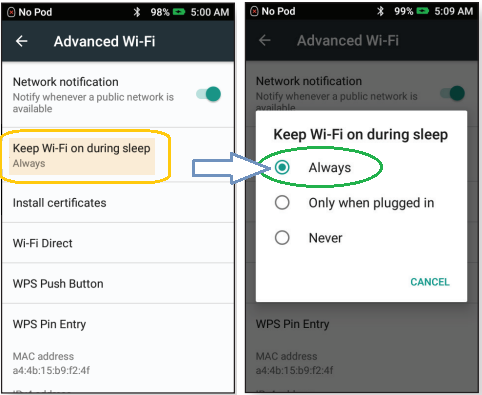
Tap the 3 dots in the upper right corner of the Wi-Fi menu then tap "Advanced"
Find "Keep Wi-Fi on during sleep" and set to "Always".
If not set to always, tap "Keep Wi-Fi on during sleep" then select "Always" from the list.
Go back to the Settings parent menu and select "About"
Confirm the Last Sync to cloud Date is recent (should be today or yesterday).
Go to Glooko and sign in
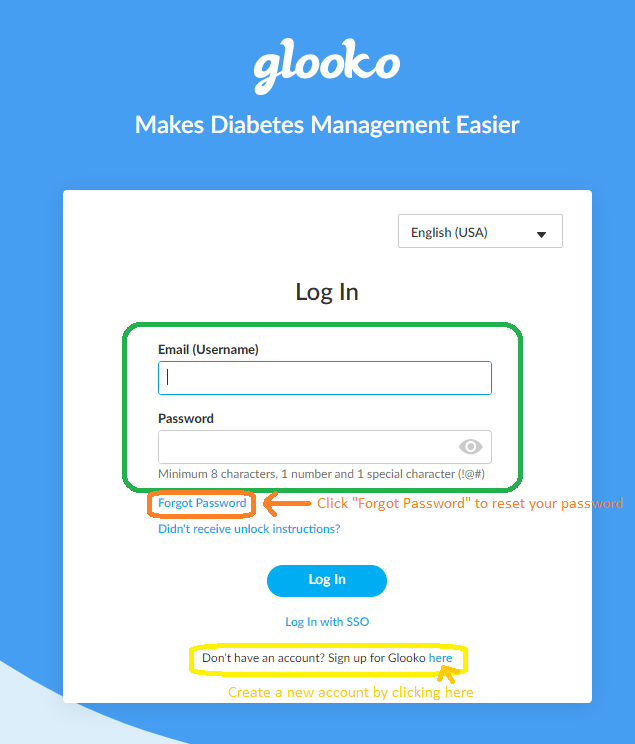
Go to my.glooko.com and sign in using your Glooko account.
If you do not already have a Glooko account, use the link at the bottom of the sign in window to create a new account.
Connect to DASH Cloud on Glooko
In the upper right corner, click the down arrow next to your account initials.
Then select "Settings"
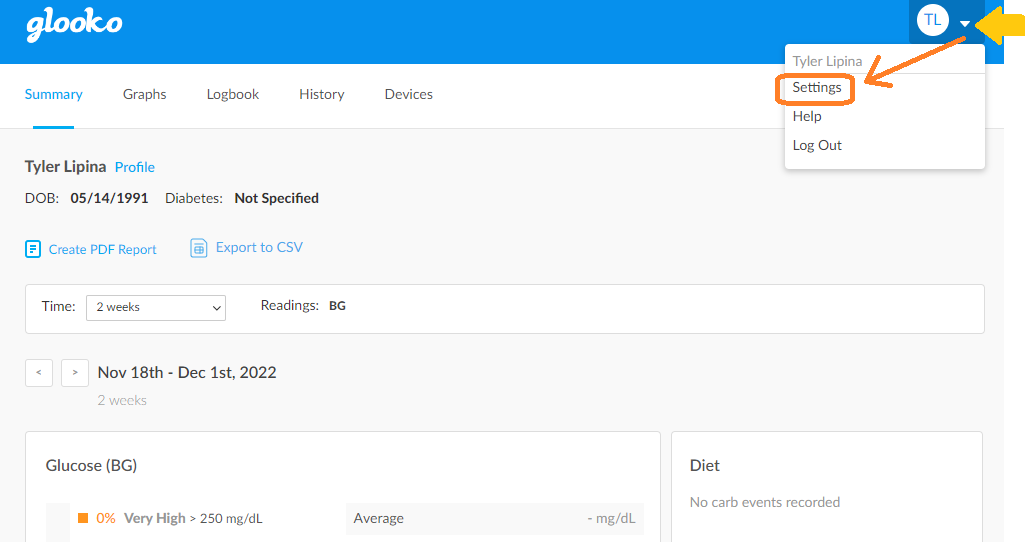
Scroll down to the Apps & Devices Section then select "Connect to DASH Cloud".

If it already reads "DASH Cloud: Connected" you can skip this section.
A pop-up directing you to PodderCentral will open. Click Connect.
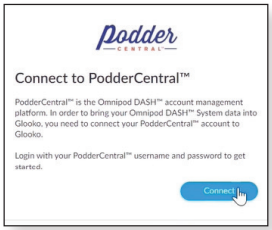
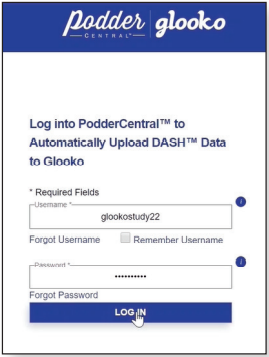
Enter your PodderCentral username and password then click "Log In".
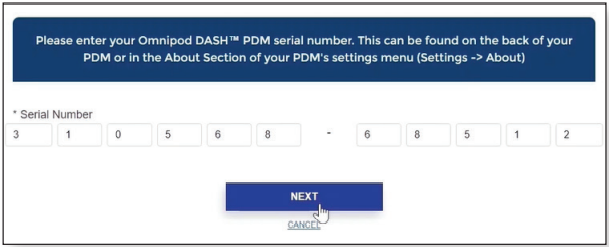
Enter the serial number of you PDM. (You can find the serial number on the back of the PDM or in the About menu (Settings --> About)).
Review and "DASH to Glooko Directed Disclosure". Check the box and select "Agree".
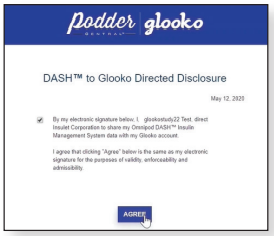
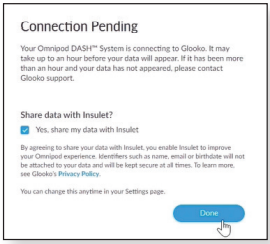
You will be redirected back to Glooko and see a box titled "Connection Pending".
Sharing your data with Insulet is optional.
Click "Done".
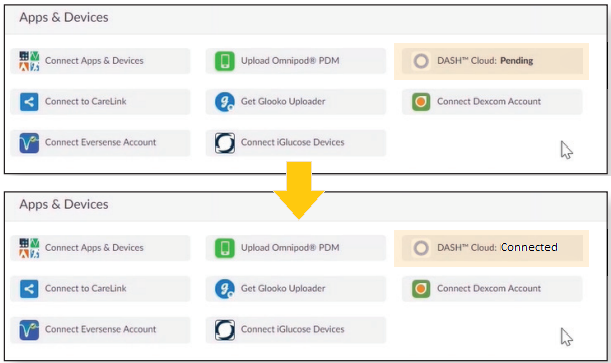
At this point, you should see you status as "DASH Cloud: Pending".
This should change to "DASH Cloud: Connected" within 10 minutes if:
- the pump has been used with an active pod for more than a day
- the PDM is connected to Wi-Fi.
Check your data
Once the status shows "DASH Cloud: Connected" return to the Summary page to confirm your data are up to date.
On the Summary Page, you should see (1) today's date displayed as the last date of date range and (2) a purple pie chart showing insulin dosing. If your CGM is linked to your pump or you are sharing data from Clarity, you should also see data under the Glucose (CGM) section.
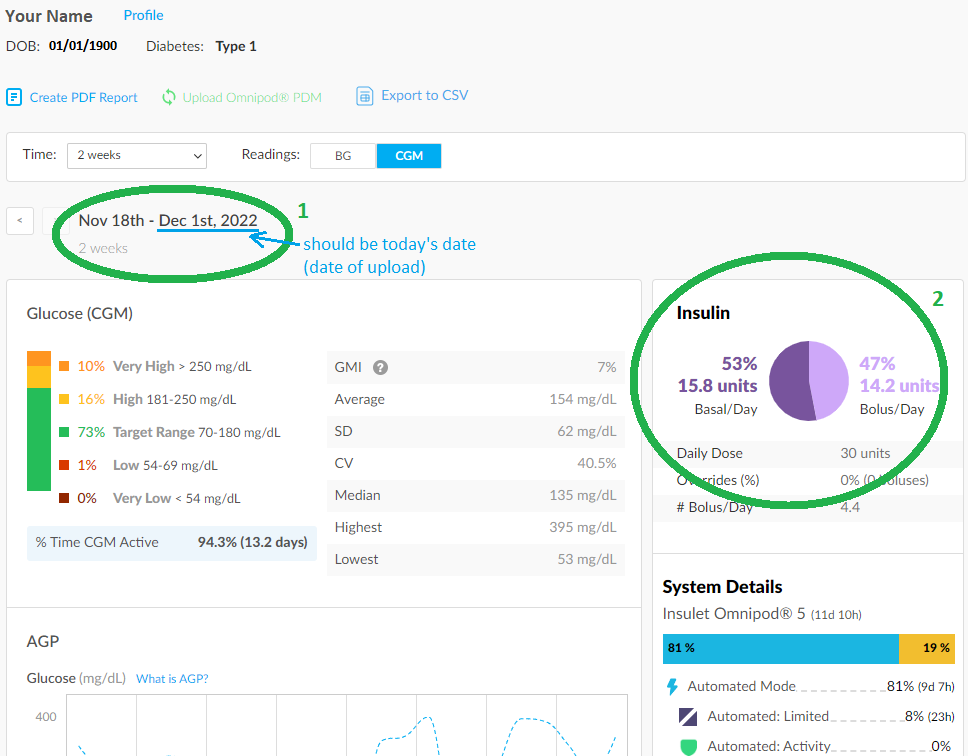
If the dates shown are not current or there is nothing showing under the Insulin section, confirm that your PDM is on Wi-Fi and DASH Cloud status is "Connected".
If you continue to have trouble, use the Manual Upload instructions to upload manually using Glooko and a USB cord.
Share your data
If you have previously shared your Glooko data with the Barbara Davis Center, you are all set.
If you have not shared, or are not sure, check the settings menu.
Click the down arrow next to the account initials, then click "Settings".
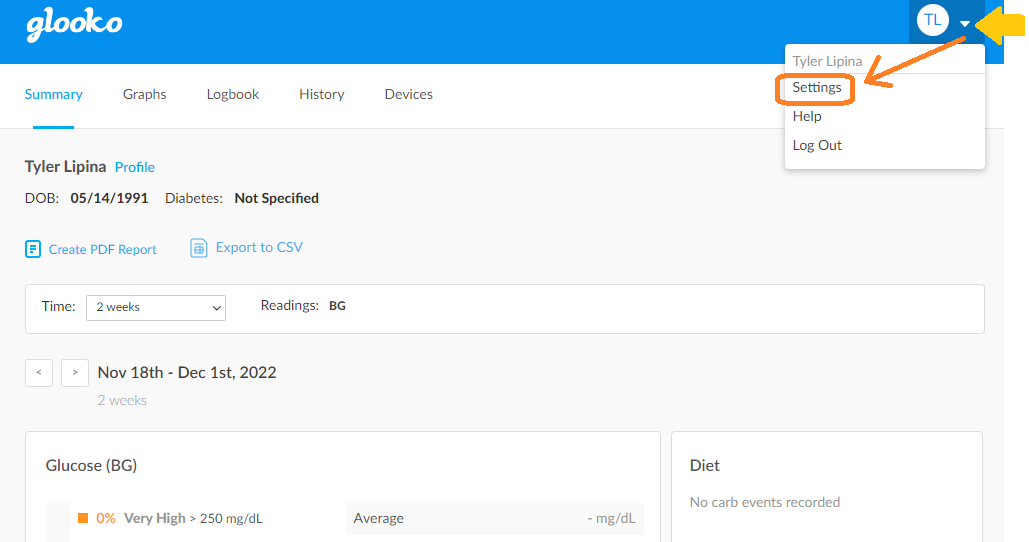
Under Account, find the ProConnect Code section.
If you are already sharing with the BDC, it will be listed here. If you see "Barbara Davis Center - Pediatric" here, there is nothing more you need to do.
If the Barbara Davis Center is not listed, click "+ Add New Code".
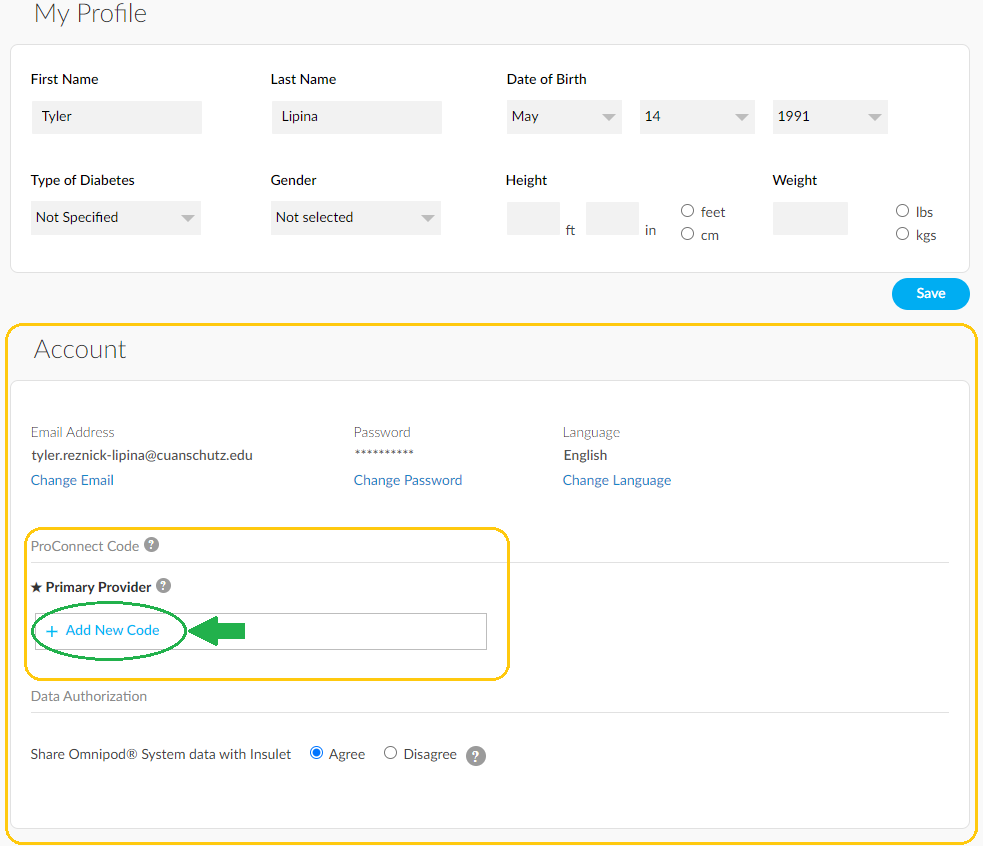
Click "Continue" on the notice box.
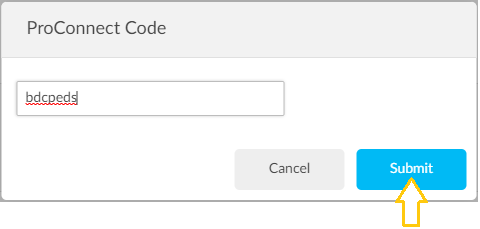
Enter the ProConnect code:
bdcpeds
Click "Submit
On the confirmation window, it should show that you are sharing with "Barbara Davis Center - Pediatric". Click Continue.
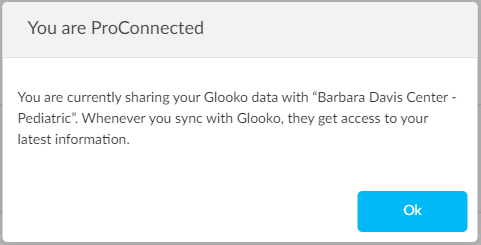
Once sharing, you should see "Barbara Davis Center - Pediatric" listed under ProConnect Code
You're all set!
If you have any questions or concerns, contact Tyler Lipina at [email protected].
